Home
Atari Asteroids Cocktail Cabinet Project
Jan. 18, 2007 - The story of a 2 hour project gone bad.
I know - this is a pinball site - So I bought 2 cocktail cabinets from the auction some months ago for a few bucks. The Centipede has all the boards but keeps resetting. That's another project.
Today's project is this Asteroids cabinet which came with no part ( gutted ).
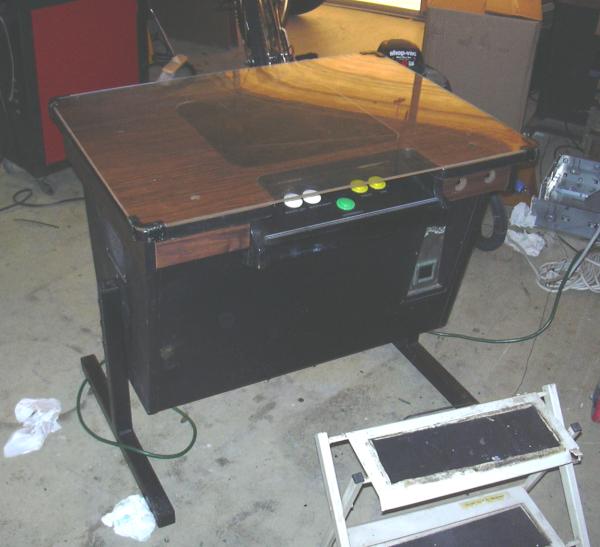
I got this to put a nice little MAME conversion together - you know, slap a computer in a box and wire the buttons - you'd figure 2 hours tops. All I really wanted to do was put Asteroids back in the table - I wasn't looking to create a mame-enstein cabinet. Here's a nice picture of the cabinet as is was - clean, crack in top panel, scuffed plexi glass but not bad - a perfect mame candidate!. I am not planning on modifying any part of the cabinet. The original harness and power supply were still in the cabinet.
I had picked up 4 identical Dell GX1 Optiplex computers at a local computer show for free. They were sitting there with a sign on them $40ea / (crossed out) $25 ea. (crossed out) $10 ea. The seller saw me looking at them and said 'You want 'em - they're yours!'. I agreed and took them. All four worked and I loaded mame 36 for DOS. This worked great so I configured all 4 boxes some months ago waiting for a cabinet to put the mame boxes into.
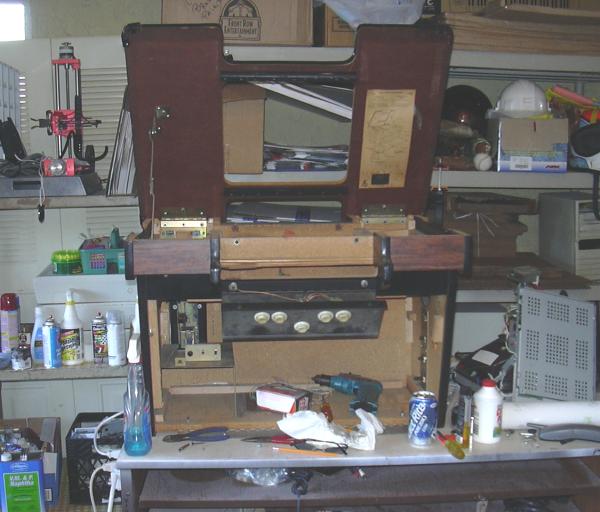
The first thing was to mount a monitor. I had a spare 14" and had to figure how to place it. An original game monitor has a nice bracket for the pcb while a standard computer monitor just has a dangling pcb when you take it out of the case.
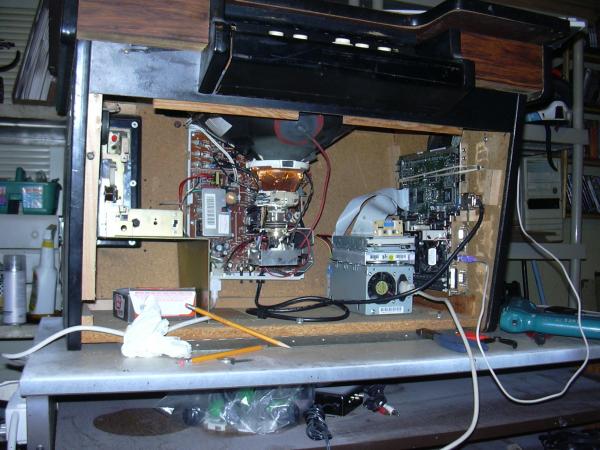
I had to add some shims to keep the monitor from falling through. I mounted the pcb to the cabinet wall with 2 drywall screws. The cpu and components were removed from the case ( there's not enough room in this cocktail cabinet for the entire DELL computers ) and mounted using the existing Atari pcb mounting. I strapped the top of the board with a heavy rubber band instead of making brackets. The DELL requires that the floppy be hooked up or the system won't boot. I'm using FREEDOS for the OS. I strapped the power supply and drives together using metal strapping (not shown). It all JUST BARELY FIT..
Buttons
Originally I had planned to do a 'keyboard' hack as the goal of this is not to spend any money. ( I'm already out $0 for the computers and $5 for the cocktail cabinet. If I have to invest any more I might have to take out a loan. ). I took my only spare ps/2 keyboard apart and discovered it was one of those membrane switch types with a small circuit board. I wasn't looking forward to hacking this and since it was my only ps/2 I put it back together and actually considered purchasing the IPAC card -- UNTIL I actually to the time to read the mame manual (RTFM) and saw that mame 36 could use a playstation jstick attached to the parallel port. I has some extra PSX controllers to tried it.
Well, maybe the hardware on the Dell or the cheap knockoff PSX controller or my mis-wiring lead to this not working. I then read on to find out that MAME 53 for dos supports direct matrixing from the parallel port. It's the -JOY TGXLPT1 option. Cool! ( I always wondered why this wasn't implemented from day 1 - turns out it's due to the Allegro libraries - where MAME gets it's input from - that added the feature - very cool! ). Here's nice link that documents the wiring: http://www.burg-halle.de/~schwenke/parport.html
Ok - So I saved $50 bucks on the IPAC and had to sacrifice one parallel cable to get the connector, and steal some resistors off an old RCA tv chassis. The diodes for the buttons are already in the Atari harness on the button panel so I didn't even have to add any! The parallel port matrix runs flawless and I'd suggest this over and solution requiring money be spent - remember - this is the froogle arcade guy website!
Well, the original buttons are the leaf switch type. The ones in the machines were probably original. If you've EVER worked in the arcades you know that you can't just clean or file these and hope it will last - it doesn't. You need to replace them. I had some leaf switches but decided to put in new buttons with micro switches. This turned on to be a mistake. The button housing were JUST 1/16 to long and hit the cabinet when you closed the button panel. I had to gouge out a small bit of the cabinet to accommodate the larger switches.
DAMN - ANOTHER PROBLEM!!!
Once I hooked up all the switches I loaded Asteroids from MAME and it worked great - EXCEPT MAME DOESN'T SUPPORT SCREEN FLIPPING FOR ASTEROIDS &^$#*&&### - I searched high and low - no support. I went through a ton of games to find out which were intended for a horizontal monitor and could use the Asteroids button configuration. I could not find any. I thought ok, I put in Galaga or Galaxian - nope - when the monitor is horizontal it cuts off the top of the screen. I settled for Space Invaders until I can research this further.
Sound
The original Atari speaker was still in the cabinet. I disassembled a pair of cheap amplified pc speakers , removed the small amplifier pcb, and mounted it to the wall using the original Atari speaker. These speakers happened to have a nice volume control. This was the simplest part of the conversion.
Done - for now
Cosmetically I didn't do any repair. The plexi is horrible and some of the cabinet's particle board was expanded from either being wet or plain high Florida humidity. The whole project took about 2 months - 4 hours labor and 2 months wondering why the heck I bought a stripped Atari Cocktail Cabinet when there's pinballs to fix! Incidentally I found $3.75 in quarters in the machine - Well, I've recovered more than half of my investment already!